To win an insurance claim, you must think like a forensic investigator, not a victim.
- Simply taking photos of damage is not enough; you must build a comprehensive case file that anticipates and neutralizes an insurer’s potential objections.
- Every piece of evidence—from time-stamped photos to call logs—creates a chain of custody that proves the timeline and extent of your loss.
Recommendation: Stop cleaning and start documenting. Your first action should be to meticulously preserve and photograph the « crime scene » of your property damage before touching anything.
The first instinct after a flood, fire, or storm damages your home is visceral: clean it up. The sight of a water-logged carpet or soot-stained walls triggers an immediate urge to erase the disaster and restore order. This is a normal human reaction. It is also, from an insurance perspective, a catastrophic mistake. Most homeowners believe that taking a few quick snapshots of the mess will suffice for their claim. They treat the process like documenting a holiday, not like building a legal case for financial recovery.
This fundamental misunderstanding is where countless valid claims begin to fail. In the world of insurance, your damaged property is a crime scene, and you are its lead investigator. The adjuster, while often helpful, works for the insurance company. Their job is not to build your case for you. Your job is to present them with a body of evidence so thorough, so meticulously documented, and so logically structured that denying or low-balling the claim becomes more difficult than paying it in full. This requires a complete shift in mindset.
Forget simply « taking pictures. » We must adopt a forensic mindset. This guide will not show you how to point and shoot. It will teach you how to see your home through the eyes of a claims investigator—to document not just the obvious damage, but the subtle, secondary evidence that proves your case. We will explore how to create an unassailable timeline, leverage independent sources, and build a narrative of loss that leaves no room for ambiguity. This is how you move from being a passive victim to the chief architect of your successful claim.
This article provides a detailed forensic protocol for documenting your loss. Follow this table of contents to navigate the essential steps for building an irrefutable claim file.
Summary: A Forensic Protocol for Documenting Property Damage Claims
- Keep the Carpet: Why You Must Not Bin Damaged Items Until Inspected?
- The Incident Diary: Recording Weather, Times, and Actions for the Claim?
- Roof Damage from Above: Using Drones to Prove Storm Impact Safely?
- Neighbour Testimony: How Independent Witnesses Help Liability Claims?
- The Call Log: Why Recording Dates and Names of Agents Is Crucial?
- The Duty to Mitigate: How Much Should You Spend on Emergency Repairs?
- Room-by-Room Video: The Ultimate Proof for Total Loss Claims?
- The First Call: What to Say (and Not Say) When Notifying Your Insurer of a Claim?
Keep the Carpet: Why You Must Not Bin Damaged Items Until Inspected?
The urge to discard a ruined, sodden carpet is powerful. Resist it. Throwing away damaged items before your insurer has inspected them is called « spoliation of evidence. » It is one of the fastest ways to have a portion of your claim denied. The insurer needs to see the damaged item to verify its existence, its original quality, and the extent of the damage. Without the physical item, they may argue it was old, of low quality, or not damaged as severely as you claim. This is not a theoretical risk; a 2024 study revealed that nearly 48% of claims were closed without payment among major insurers, often due to insufficient proof.
Your damaged items are the most critical pieces of evidence. You must preserve them. If they are a hazard (e.g., mouldy), move them to a garage, a tarp in the yard, or another contained area, but do not dispose of them. Your primary role is to act as a museum curator for your own disaster. Photograph everything meticulously before moving it. Capture the item in its original, damaged location, then take detailed photos once you’ve moved it to a safe holding area. The goal is to prove « I owned this, it was in this condition, and the incident damaged it in this specific way. »
This forensic approach applies to everything, not just big-ticket items. It includes furniture, electronics, clothing, and even building materials like drywall and flooring. By preserving the evidence, you remove the insurer’s ability to speculate. You replace their assumptions with your hard facts.
Your Action Plan: Forensic Photography of Damaged Items
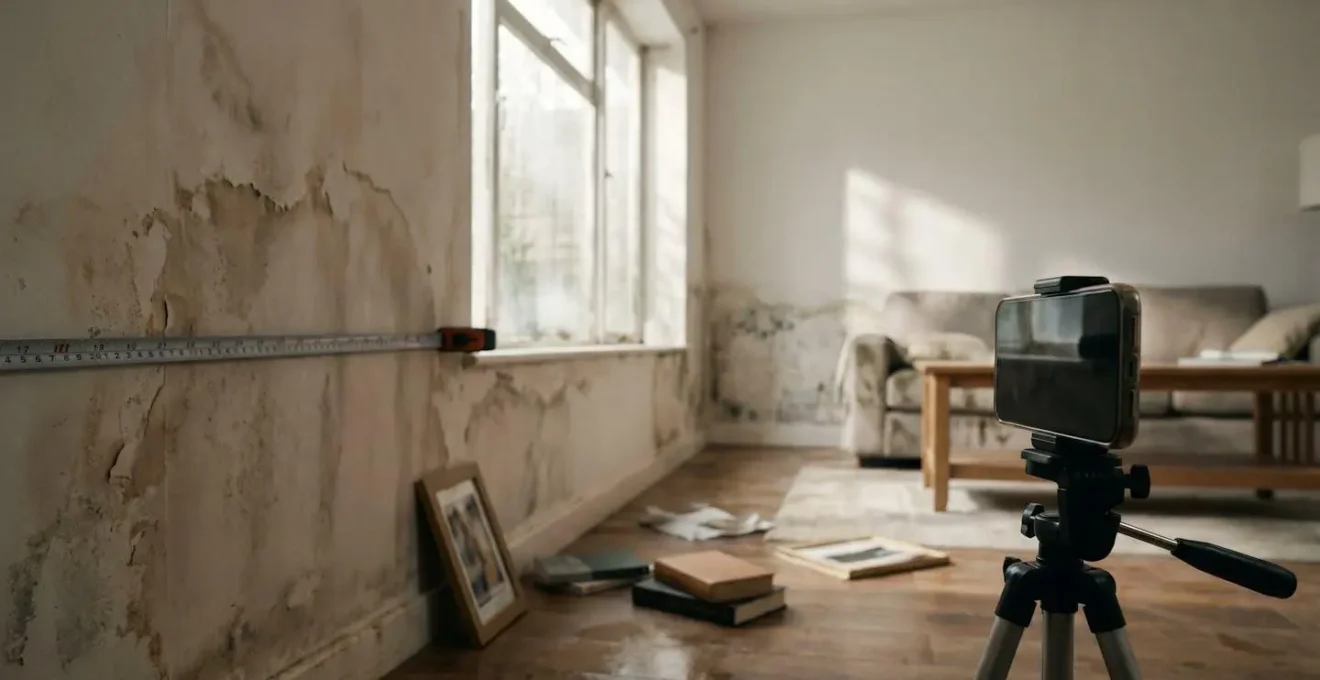
- Overall and Detail Shots: Take wide-angle digital photographs and video of each damaged item in its original location, then move in for close-ups of the damage itself (e.g., water lines, soot particles, warping). Shoot from multiple angles.
- Establish Scale and Quality: Include a ruler or tape measure in photos to show the size of the damage. For appliances and electronics, photograph the brand label, model number, serial number, and any material tags to prove original quality and value before disposal.
- Verify and Time-stamp: Ensure your camera settings embed the date and time in the photo’s metadata. As a backup, note the date and time each photo was taken in your incident diary. This creates a verifiable timeline.
- Control Your Lighting: Your photos are evidence, not art. Ensure they are well-lit. Check that details are not lost in shadows (underexposed) or blown out by a flash (overexposed). Natural light is often best.
- Create a Full Inventory: Your photo log is your visual inventory. Match each photo or set of photos to an item on your written list of damaged property, creating an undeniable link between the item and the proof of its damage.
The Incident Diary: Recording Weather, Times, and Actions for the Claim?
Your memory is fallible, especially under stress. An insurance claim can span months, involving numerous conversations and deadlines. Relying on memory is a failed strategy. The moment an incident occurs, you must start an « Incident Diary. » This can be a physical notebook or a digital document, but it becomes the central nervous system of your claim—a chronological record of events, observations, and communications that is contemporaneous and therefore highly credible.
This diary is your narrative of the loss. What was the exact date and time you first noticed the damage? What were the weather conditions (e.g., « heavy rain for three hours straight »)? What immediate actions did you take? Who did you call, and at what time? This level of detail seems excessive in the moment but becomes invaluable weeks later when an adjuster asks for a precise timeline. A detailed diary prevents you from misspeaking or forgetting crucial facts that could impact your coverage.
To add a layer of forensic credibility, use third-party timestamping methods. For instance, when taking photos, include a shot of that day’s newspaper or a recent utility bill next to the damage. When filming a video walkthrough, state the date and time out loud. These simple acts create a verifiable digital audit trail that counters any suggestion that your documentation was fabricated after the fact. It’s a technique that proves when the damage was documented, which is critical for justifying claims and accessing coverage for things like Additional Living Expenses.
This meticulous record-keeping is not paranoia; it is professionalism. It demonstrates to the insurer that you are organized, serious, and in command of the facts of your own case. It transforms your claim from a collection of chaotic anecdotes into a structured, evidence-based report.
Roof Damage from Above: Using Drones to Prove Storm Impact Safely?
After a major storm, one of the most critical and dangerous tasks is assessing roof damage. Climbing a ladder onto a potentially compromised roof is a risk you should never take. This is where modern forensic techniques provide a safer, more effective solution: drone photography. A drone can become your eye in the sky, providing a comprehensive and detailed assessment of storm impact without you ever leaving the ground.
The evidence a drone can capture is far superior to what can be seen from the ground. It can document the full pattern of damage across the entire roof, not just the section you can see from the street. High-resolution imagery can capture subtle but significant damage that proves the mechanism of loss, such as:
- Lifted or creased shingles that indicate wind damage, not just missing ones.
- Damage to flashing around vents, chimneys, and other penetrations where leaks often begin.
- The extent of granule loss in your gutters, which serves as clear evidence of hail impact or the sheer force of wind and rain weathering your shingles.
This is not a gimmick; it’s a strategic advantage. National insurers themselves have embraced this technology, reporting that drones have led to a 30% to 40% reduction in claims cycle time and a significant boost in adjuster efficiency. By providing your own drone imagery, you are speaking the insurer’s language and preemptively providing the high-quality evidence they need to approve the claim. Furthermore, the drone’s metadata (GPS coordinates and timestamps) automatically preserves the location and time of the inspection, adding another layer of undisputed proof to your evidence chain of custody.
Neighbour Testimony: How Independent Witnesses Help Liability Claims?
Not all evidence is physical. In many claims, especially those involving liability (e.g., a tree from your property falling on a neighbor’s fence, or a fire that impacts an adjoining unit), the testimony of independent witnesses can be crucial. A neighbor who saw the storm fell the tree, or who can attest to the timeline of a fire, provides a third-party perspective that bolsters your version of events. However, the forensic mindset requires understanding the hierarchy of this type of evidence.
Informal witness statements from neighbors are valuable for corroboration. They can help establish a timeline, confirm the cause of the incident, or describe its severity. As one property insurance expert notes, the key is that « Witness statements should corroborate specific facts. » A simple note saying, « I saw the tree fall at 2 PM during the high winds, » is far more powerful than a vague statement. When you collect such a statement, ask your neighbor to date and sign it. This adds a small but significant layer of formality.
However, you must recognize that an insurer will always give more weight to official reports. These documents are primary evidence. If the incident involved theft or vandalism, a police report is non-negotiable. If it involved a fire, the fire department’s report is the gold standard. These official documents provide third-party verification from a trusted authority, which is incredibly difficult for an insurer to dispute. Your first step after ensuring everyone’s safety should be to contact the relevant authorities and then actively request a copy of their report as soon as it’s available. A neighbor’s statement supports your claim; an official report anchors it.
The Call Log: Why Recording Dates and Names of Agents Is Crucial?
Your insurance claim will be managed through a series of phone calls with a rotating cast of characters: intake agents, desk adjusters, field adjusters, and their supervisors. Each conversation is a critical data point in your claim’s journey. Relying on your memory to track these interactions is a recipe for disaster. The « he said, she said » of a disputed conversation is a battle you will almost always lose. This is why a meticulous call log is a non-negotiable tool in your forensic arsenal.
From your very first call to report the claim, start a new section in your Incident Diary dedicated to communications. For every single phone call, you must document:
- The date and time of the call.
- The full name and specific role of the person you spoke to.
- A summary of the conversation, including any promises or authorizations made, using their exact wording.
- Any deadlines mentioned for submitting documentation or for appeals.
- Your claim number, which should be at the top of every page.
The masterstroke of the forensic communicator is to take this a step further: follow up every important phone call with a confirming email. This simple action moves the conversation from the unreliable realm of verbal communication into the permanent, written record. A short email— »Hi [Agent’s Name], just to confirm our conversation today at 2:15 PM, you authorized us to proceed with the emergency water extraction and advised the claim number is #12345. Please let me know if I have misunderstood anything. »—creates an undisputed paper trail. It forces accountability and builds a written history of your claim that cannot be easily ignored or contradicted.
The Duty to Mitigate: How Much Should You Spend on Emergency Repairs?
Every property insurance policy contains a clause requiring you to perform your « duty to mitigate. » This means you have an obligation to take reasonable steps to prevent the damage from getting worse. For example, if a storm breaks a window, you should board it up to prevent rain from entering. If a pipe bursts, you should call a plumber to stop the leak and a service to extract the standing water. The key concept here is « reasonable. » The costs you incur for these temporary, emergency measures are typically reimbursable under your policy.
However, this is where many homeowners make a critical error. Mitigation is not restoration. Tarping a hole in the roof is mitigation. Hiring a roofer to install new shingles is a permanent repair, and you should never begin permanent repairs without the explicit, written approval of your insurer. Doing so can give them a reason to deny payment, arguing that they didn’t have a chance to inspect the original damage.
Photos taken before you touch anything are critical for proving the initial condition and scope of damage.
– CompanyCam Insurance Documentation Team, Photo Documentation That Gets Insurance Claims Approved Faster
This is where your forensic documentation is paramount. You must prove that your mitigation efforts were necessary and the costs were reasonable. This is achieved with a three-stage documentation process:
- Before: Take extensive photos and videos of the situation *before* any mitigation work begins. This proves the initial state and justifies the need for action.
- During: Document the mitigation work in progress. Photos of the water extraction company at work or the tarp being installed prove the work was done.
- After: Capture the completed temporary fix. Keep every receipt from the emergency services you hired.
This before-during-after sequence creates a powerful narrative that justifies your expenses and proves you acted responsibly to protect the property, fulfilling your duty to mitigate without jeopardizing your claim.
Room-by-Room Video: The Ultimate Proof for Total Loss Claims?
While still photos are essential for documenting specific damage, nothing tells the story of your total loss like a continuous, narrated video walkthrough. For a major claim involving the contents of your home, a « forensic video inventory » is the single most powerful piece of evidence you can create. It proves not only what you owned but also its condition and the sheer volume of your possessions in a way that a static list cannot.
The process is methodical. Begin at the entrance to your home and film continuously as you walk through. For each room, follow a strict protocol:
- Start with a wide shot from the doorway to establish the entire space.
- Pan slowly across the room, verbally narrating what you see. State item names, brands, models, and their visible condition. For example: « Entering the living room. On the wall is a Sony 65-inch television, model X90K. It has visible water damage on the lower casing and will not power on. »
- Open every closet, drawer, and cabinet. This is crucial for proving the volume and quality of your contents, which are often underestimated.
- For extra verification, record a verbal timestamp during filming: « It is now 3:30 PM on Tuesday, October 26th. »
- Once completed, immediately upload the unedited video file to a cloud service like Google Drive or Dropbox. This preserves the original file’s metadata, which serves as a credible, third-party timestamp.
This method counters the common insurance tactic of « penny-itemizing, » where an adjuster questions every single item on a long list. The video provides undeniable proof of existence and condition. Given that insurance adjusters typically need between 30 to 50 photos for a typical water damage claim and over 100 for complex jobs, a comprehensive video can efficiently consolidate a massive amount of evidence into a single, compelling file.
Key Takeaways
- Adopt a Forensic Mindset: Treat your damaged property as a crime scene. Your role is to be the lead investigator, not a passive victim.
- The Evidence Hierarchy: Understand that official reports (police, fire) and meticulous, time-stamped documentation carry more weight than informal statements or memories.
- Create an Unbroken Narrative: Your documentation—photos, videos, diary, and call logs—must work together to tell a clear, chronological, and irrefutable story of your loss.
The First Call: What to Say (and Not Say) When Notifying Your Insurer of a Claim?
The very first call you make to your insurer to notify them of a claim sets the tone for the entire process. This is a moment where what you say—and what you don’t say—is critically important. The call will be recorded, and your words can and will be used to evaluate your claim. Adhering to a forensic communication protocol from this first interaction is essential.
The most important rule is the no speculation rule. Stick to the known facts. Do not guess about the cause or the extent of the damage. For example, instead of saying, « I think the fire was caused by old wiring, » simply state, « A fire started in the wall of the bedroom. » Speculation can be recorded and used against you later if the actual cause is found to be different. Describe the damage you can see clearly and precisely, avoiding vague terms like « bad » or « a lot of damage. » State « There is three inches of standing water in the basement, » not « The basement is flooded. »
This is not a passive call. You are also gathering intelligence. You must come away from this first call with critical information. Have your incident diary ready and be prepared to ask a series of direct questions:
- « What is my claim number? » (Write it down immediately).
- « What are my immediate duties under the policy regarding mitigation? »
- « Who is my assigned adjuster, what is their contact information, and when can I expect them to contact me? »
- « What is the general timeline for the adjuster’s first inspection? »
- « Do I have coverage for temporary living expenses if the property is uninhabitable? »
Requesting this information positions you as an organized and proactive partner in the process, not just a claimant. It establishes your control over the information flow from the very beginning.
By systematically applying this forensic mindset to every aspect of your insurance claim, you shift the balance of power. You are no longer simply asking for help; you are presenting a professional, evidence-based case for the compensation you are owed. To put these principles into action, the next logical step is to begin building your own comprehensive claim file with this newfound discipline and precision.