Surviving a major home disaster isn’t about luck; it’s about understanding the hidden operational playbook that insurers and restorers use, allowing you to manage the process instead of being managed by it.
- The first 48 hours are a forensic window where your actions can either secure or jeopardize the financial outcome of your entire claim.
- Insurance is designed to restore « Like-Kind-and-Quality, » not to fund your dream renovation; navigating upgrades requires precise negotiation and personal investment.
Recommendation: Shift your mindset from that of a victim to the project manager of your own recovery. Document everything with a forensic eye and question every decision that involves demolition or permanent alteration.
The moment you see the smoke, the rising water, or the cracks forming in your walls, your world shrinks to a single, terrifying thought: « I’m losing everything. » In the chaotic aftermath of a major peril, the natural response is panic and confusion. You’re told to « call your insurance company » and « document the damage, » but this generic advice is dangerously insufficient. It leaves you vulnerable in a process that is far more complex and adversarial than most homeowners realize. You are not just dealing with a damaged building; you are entering a high-stakes financial negotiation where you are at a significant information disadvantage.
As a disaster recovery specialist, I’ve seen firsthand how well-meaning families make critical errors in the first few days that cost them tens, if not hundreds, of thousands of dollars. They trust that the process is designed to help them, not realizing it’s an operational system with its own rules, timelines, and priorities. The key to financial survival is not just to follow instructions, but to understand the hidden playbook used by adjusters, forensic investigators, and restoration companies. It’s about knowing why certain things happen, when to push back, and how to protect your one and only chance to rebuild your life correctly.
This guide pulls back the curtain on that process. We will move beyond the platitudes and into the operational realities of a major claim. We’ll explore the silent but destructive power of heave, the forensic precision required after a fire, and the critical decisions that determine whether your flooded home is saved or unnecessarily gutted. By understanding the system, you can move from a state of terror to a position of control, ensuring you navigate the financial shock and emerge whole on the other side.
To navigate this complex journey, we will break down the critical stages and misunderstood concepts of the recovery process. This table of contents will guide you through the essential knowledge you need to protect your home and finances.
Contents: A Specialist’s Guide to Major Peril Recovery
- Why Heave Can Be More Destructive Than Subsidence After Removing a Tree?
- The Forensic Investigation: What Happens in the First 48 Hours After a House Fire?
- Flood vs Fire: Which Claim Takes Longer to Settle and Restore?
- The 5 Documents You Must Save Instantly During a Major Peril Evacuation
- How to Dry Out a Flooded House Without Causing Secondary Rot?
- Betterment during Repair: Can You Pay Extra to Upgrade the Kitchen While They Fix It?
- Hotel or Rental? How to Demand Housing That Matches Your Current Lifestyle
- Drying Out vs Stripping Out: Avoiding Unnecessary Demolition After a Flood?
Why Heave Can Be More Destructive Than Subsidence After Removing a Tree?
When homeowners think of ground-related structural damage, they almost always think of subsidence—the sinking of the ground beneath their home. It’s a well-known risk, with insurers in the UK paying out significant sums, such as the £66 million in subsidence payouts in Q3 2023 alone. However, its opposite, heave, can be a far more insidious and destructive force, especially after the removal of a large, mature tree that was close to the property. Heave is the upward movement of the ground, and it attacks your home’s foundation with immense lifting pressure.
The mechanism is simple but powerful. A large tree acts like a massive water pump, drawing hundreds of gallons of moisture from the surrounding clay soil every day. When you remove that tree, you turn off the pump. The soil, which was kept relatively stable, begins to reabsorb water without a release valve. As it becomes saturated, it swells and expands with incredible force, pushing foundations, floor slabs, and brickwork upwards. Unlike subsidence, which often happens slowly and can sometimes be monitored, heave can be aggressive and non-uniform, causing more complex structural failures.
As experts at Lansdown Insurance Brokers explain, the nature of this upward movement is key to its destructive potential.
Heave is essentially the opposite of subsidence. Instead of the ground sinking, it rises, pushing the foundations upward. This upward movement often results from the soil expanding due to excess moisture, which can happen when a large tree is removed, causing the soil to swell.
– Lansdown Insurance Brokers, Understanding Subsidence, Heave & Landslip article
Diagnosing heave versus settlement or subsidence is a specialist task. The crack patterns are different—heave often results in horizontal cracks widening at the top, while subsidence cracks are typically wider at the bottom. Misdiagnosis can lead to disastrously wrong repairs, such as underpinning a house that is actually being pushed upward. This makes expert geotechnical and structural engineering assessment non-negotiable before any repair is planned.
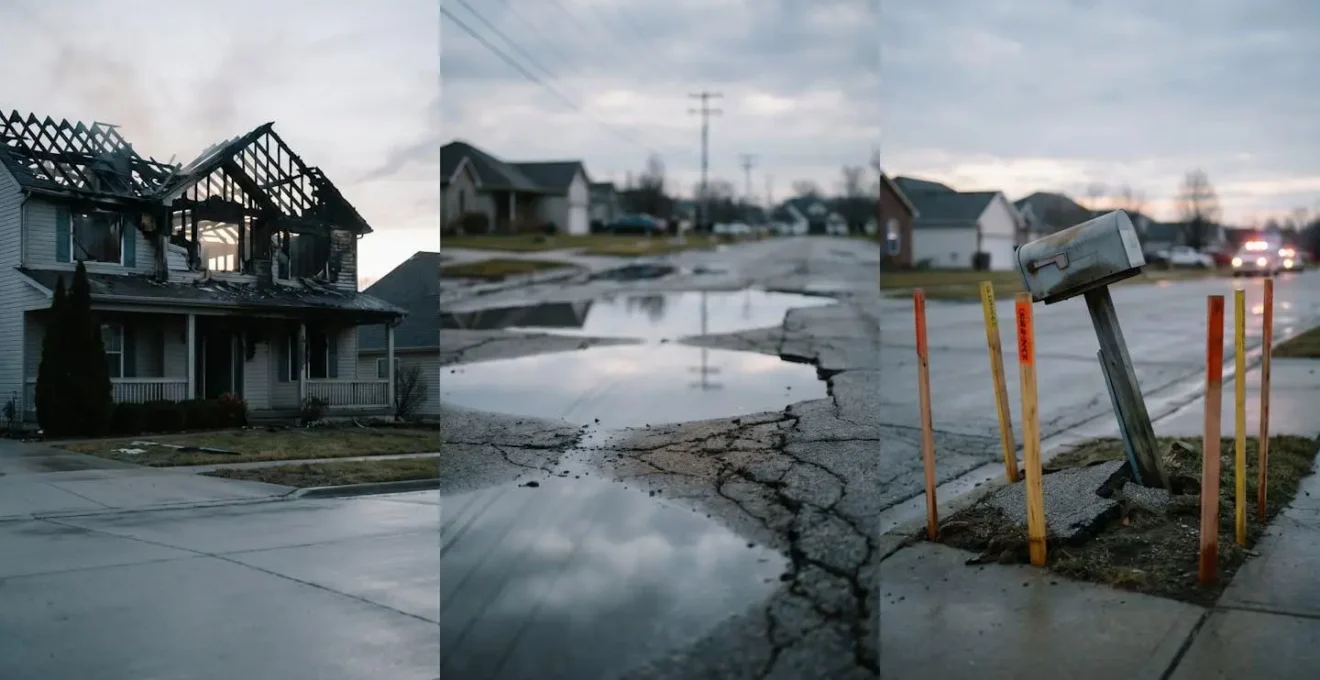
The Forensic Investigation: What Happens in the First 48 Hours After a House Fire?
After the fire department leaves, your home is not just a damaged structure; it’s a potential crime scene. Even if the fire was clearly accidental, your insurance company will treat the first 48 hours as a critical forensic investigation period. The goal is « cause and origin » analysis, and everything you do—or fail to do—during this window can profoundly impact your claim. The single biggest mistake a homeowner can make is to disturb the scene, believing they are « cleaning up. »
An insurer will dispatch a specialist fire investigator, often a former firefighter or law enforcement officer, to meticulously examine the evidence. They are trained to read char patterns on walls, analyze the melting points of different materials, and trace the fire’s path back to its source. They will photograph everything, take samples of debris for lab analysis, and secure any potential ignition sources like appliances or wiring. This is your first introduction to the operational playbook of insurance: nothing happens without evidence.
This investigation isn’t just about detecting arson. It’s also about subrogation—determining if a faulty product, like a dishwasher or a phone charger, was responsible. If they can prove a third party is at fault, your insurer can recover their payout from that manufacturer. Your role is to be a gatekeeper. Do not allow anyone onto the property without authorization from your insurer, and do not dispose of anything, no matter how burnt or seemingly worthless. That pile of ash could be the key to your claim.
Case Study: The « Undetermined » Fire Solved by Digital Forensics
The depth of these investigations can be surprising. A compelling example from a Missouri federal court trial highlights the stakes. After a fire that investigators classified as « undetermined, » the insurer’s team delved into the homeowners’ cellular records and GPS data. By cross-referencing call timestamps with cell tower locations, they proved the fire was already burning before the insureds claimed to have left the property. This material misrepresentation led to a verdict in favor of the insurance company, demonstrating that the forensic investigation extends far beyond the physical evidence at the scene.
Flood vs Fire: Which Claim Takes Longer to Settle and Restore?
Homeowners often ask which disaster is « worse » from an insurance perspective. While both are devastating, the timeline for recovery—what I call claim velocity—differs significantly. Generally, a total-loss fire claim, while emotionally traumatic, can often be a more straightforward and faster process to settle than a major flood. This seems counter-intuitive, as a fire’s destruction is so absolute, but the difference lies in the nature of the damage and the claims process itself.
A house fire often results in a clear-cut decision: the structure is a total loss and must be demolished and rebuilt. Once the forensic investigation is complete and the cause is determined not to be fraudulent, the claim moves to valuing the structure and contents. This is a process of accounting, not of ongoing discovery. You and the adjuster work to agree on the cost to rebuild and the value of your lost possessions. Once a settlement is reached, a check is cut, and you can begin the rebuilding process.
Flooding, however, is a different beast. The damage is often hidden and progressive. Water wicks into drywall, soaks into structural timbers, and creates a perfect breeding ground for mold and rot that may not be visible for weeks. This creates immense uncertainty. The key conflict becomes: what needs to be stripped out versus what can be dried and saved? This ambiguity leads to disputes between the homeowner, the insurer’s adjuster, and restoration contractors. Furthermore, after widespread flooding events, adjusters become overwhelmed. As Scott Friedson of Insurance Claim Recovery Support notes, « the process can stretch significantly longer as adjusters balance hundreds of cases simultaneously. » This bottleneck dramatically slows down claim velocity.
While timelines vary, it’s not uncommon for a straightforward fire claim to be largely settled within a few months, whereas a complicated flood claim can drag on for over a year due to drying processes, mold remediation, and arguments over the scope of repair. For instance, the U.S. National Flood Insurance Program (NFIP) aims to finalize claims in 4-8 weeks, but this can extend dramatically in catastrophic events.
The 5 Documents You Must Save Instantly During a Major Peril Evacuation
In a true emergency evacuation, you have seconds to make decisions. When your life is on the line, material possessions become secondary. However, a small, organized « grab-and-go » file of critical documents can mean the difference between a smooth recovery and a bureaucratic nightmare that lasts for months. If you have to leave, and it is safe to do so, these are the documents that form the bedrock of your financial recovery. Forgetting them can leave you unable to prove who you are, what you own, or what you are owed.
Think of this not as a collection of papers, but as the master key to restarting your life. Without these, you will struggle to open a claim, apply for aid, access your bank accounts, or even check into a hotel. Ideally, you should have both physical copies in a waterproof, fire-resistant bag and encrypted digital copies stored in a secure cloud service. This redundancy is your best defense against total loss.
In the chaos of a major disaster, having this information at your fingertips allows you to immediately begin the recovery process, even from a shelter or a hotel room. It gives you the power to act decisively while others are still trying to figure out who to call. Here is the essential checklist to prepare ahead of time.
Your Major Peril Evacuation ‘Grab-and-Go’ Financial Kit:
- Personal & Family IDs: Gather passports, driver’s licenses, birth certificates, and social security cards for every member of the household.
- Insurance Policies: Secure complete policy documents for home, auto, and life insurance, especially the crucial « declarations page » that lists your coverage limits.
- Legal & Estate Files: Collect wills, trusts, and power of attorney documents. These are vital if a family member is incapacitated or worse.
- Core Financial Records: Grab recent bank and investment statements, the last 2-3 years of tax returns, and your mortgage payment coupon or statement.
- Proof of Ownership & Value: Save property deeds, vehicle titles, and, most importantly, your home inventory (ideally as photos or video on a USB drive or in the cloud).
Preparing this kit is not an act of pessimism; it is an act of profound control. It is the single most effective five-minute task you can do to protect your family’s financial future from a worst-case scenario.
How to Dry Out a Flooded House Without Causing Secondary Rot?
After a flood, the most dangerous enemy is not the water you can see, but the moisture you can’t. The primary goal of flood mitigation is to remove water and moisture as quickly as possible to prevent secondary damage, specifically mold and structural rot. This is a race against time; mold can begin to grow on damp surfaces within 24-48 hours. Crucially, many standard insurance policies, including the NFIP, have strict limitations on mold coverage. As the National Flood Insurance Program explicitly warns, policyholders should « do all you can to prevent the growth and spread of mold, as NFIP policies do not cover damage from mold. »
This means your insurer has a vested interest in an aggressive drying plan. Professional restoration companies will arrive with powerful equipment: low-grain refrigerant dehumidifiers, high-velocity air movers, and moisture meters. Do not mistake this for simply setting up a few household fans. This is a scientific process of managing temperature, humidity, and airflow to draw moisture out of building materials. The air movers are not aimed at wet floors; they are positioned to create a circular vortex of air across damp walls and surfaces to accelerate evaporation.
The key to avoiding rot is verification. A house is not « dry » when it feels dry to the touch. It is dry when a professional-grade moisture meter confirms that the wooden studs, subfloor, and drywall are back to an acceptable equilibrium moisture content (typically below 15%). This is non-negotiable. Allowing a contractor to close up walls before this has been verified with documented readings is the #1 cause of hidden mold and rot that can emerge months or years later, long after the claim is closed.
Your job is to be the quality control manager. Insist on seeing daily moisture readings for affected areas. Question any plan that seems rushed or doesn’t involve professional-grade drying equipment. The goal is to dry the structure, not just the surfaces.
Betterment during Repair: Can You Pay Extra to Upgrade the Kitchen While They Fix It?
A major disaster often presents a strange, bittersweet opportunity. With your home being rebuilt, it’s natural to wonder, « Can I finally get that open-plan kitchen or upgrade to granite countertops? » The answer is yes, but it must be handled with extreme financial and contractual precision. This concept is known in the insurance world as betterment. Your insurance policy is not a blank check; it is a contract to indemnify you, meaning to put you back in the position you were in just before the loss. It owes you for a « Like-Kind-and-Quality » (LKQ) replacement, not for your dream upgrade.
Here’s how the operational playbook works: The insurance adjuster will create a scope of loss that details the cost to replace your 10-year-old laminate countertops and standard cabinets. Let’s say that cost is $15,000. If your desired granite countertops and custom cabinets cost $25,000, the insurance company will pay their share ($15,000), and you will be responsible for the « betterment » portion ($10,000) out of your own pocket. This sounds straightforward, but the process is fraught with risk.
You must have a separate contract or a very clear change order with your contractor that delineates the insurance-covered work from your paid upgrades. Without this, funds can become co-mingled, and it becomes impossible to track what the insurer has paid for versus what you have. Furthermore, you introduce new risks. As the public adjusters at Aspray note, most policies « will not cover defective workmanship. » If your upgraded kitchen is installed improperly, your insurer will deny the claim for repair, arguing it was part of the betterment you managed, not the original insured restoration.
To navigate this successfully, you need three things: a detailed estimate from the adjuster outlining the exact LKQ replacement cost, a clear, itemized quote from your contractor for the upgraded work, and a transparent payment schedule. You are essentially acting as a second client to the contractor, and you must manage your portion of the project with the same rigor as the insurance-funded portion.
Hotel or Rental? How to Demand Housing That Matches Your Current Lifestyle
Being displaced from your home is profoundly disorienting. The part of your homeowner’s policy that covers this is called Additional Living Expenses (ALE) or « Loss of Use. » This coverage is a lifeline, designed to pay for the *increase* in your living costs while your home is uninhabitable. It is not, however, a free-for-all. The guiding principle is that it should allow you to maintain your normal standard of living. This is one of the most contentious parts of a claim, and you must be proactive to get what you are owed.
Insurers often initially default to placing families in an extended-stay hotel. While this works for a week or two, it is not a solution for a multi-month displacement. A family of four cannot maintain a normal standard of living in a single hotel room. You have a right to « like-kind-and-quality » housing. If you lived in a 3-bedroom house with a yard for your dog, you are entitled to a 3-bedroom rental with a yard, not two adjoining hotel rooms. You must firmly and clearly state that a hotel is not a comparable living situation for a long-term displacement.
The financial backing for this is significant. According to standard policy language, most insurers provide 20% of the dwelling’s coverage limit for Additional Living Expenses. If your home is insured for $500,000, you could have up to $100,000 available for ALE. Your job is to document your normal costs (mortgage, utilities, food) and compare them to your temporary costs (rent, temporary utilities, increased food costs from eating out). The difference is what ALE covers. Be meticulous. Keep every receipt for laundry, extra mileage, pet boarding, and any other cost incurred solely because you are displaced.
Do not accept the first, easiest option the insurer offers. Research rental properties in your school district and present them to the adjuster. Frame your request around maintaining your family’s normal life—school, work, community—which is the entire purpose of the coverage. Be reasonable, be firm, and be prepared to justify every expense with documentation.
Key Takeaways
- The recovery process is a managed system, not chaos. Understanding its rules—from forensics to claim velocity—is what gives you control over the outcome.
- The first 48 hours after a disaster are forensically critical. Your actions, and what you protect, can define the scope and success of your entire insurance claim.
- Your policy’s goal is to restore « Like-Kind-and-Quality, » not to fund upgrades. Navigating « betterment » during repairs requires careful financial management and clear contracts.
Drying Out vs Stripping Out: Avoiding Unnecessary Demolition After a Flood?
This is the final, critical judgment call in a flood recovery and perhaps the most common source of conflict. After the initial water is removed, you face a stark choice: do you trust in an aggressive drying process, or do you start tearing out walls, floors, and cabinets? The answer dictates the cost, timeline, and invasiveness of your entire restoration. There is a powerful tension between the need to act quickly and the need to act correctly, as damage can take time to appear. As the Flood Insurance Guru guide points out, « Flood damage often reveals itself over days or weeks as materials dry out and problems become visible. »
Restoration companies, who are often paid based on the scale of the work, may have a bias towards « stripping out. » It’s a faster, more definitive way to remove potentially damaged materials and move on to the rebuild. For the insurer, it can sometimes be cheaper to gut a room than to pay for weeks of specialized drying and monitoring. However, for you, the homeowner, this can mean unnecessary demolition of a perfectly salvageable home. Unnecessary demolition increases the time you are out of your house and can lead to a « patchwork » repair that never feels quite right.
The alternative is a methodical « drying-in-place » strategy. This involves using the scientific drying techniques discussed earlier, combined with minimally invasive inspection. This could mean drilling small holes at the base of walls to introduce dry air into the wall cavity or using thermal imaging cameras to detect hidden pockets of moisture without tearing out the drywall. This approach is slower and requires more monitoring, but it can save huge sections of your home from the landfill.
Your role is to be the skeptic. Before you authorize any demolition, ask for proof of permanent damage. This means moisture readings that are not improving, evidence of delamination (materials separating), or visible microbial growth. Do not accept « it’s probably all ruined » as a justification. This decision is the final exam of your role as the manager of your recovery, balancing expert advice against your own interest in preserving as much of your home as possible. This is where understanding the entire system pays off, a system responsible for handling claims from the more than $87.5 billion paid across more than 2.7 million flood insurance claims in the US since 1978.
The journey from catastrophic loss to a fully restored home is a marathon, not a sprint. It requires resilience, meticulous record-keeping, and the willingness to question authority. Armed with this knowledge, you are no longer just a victim of circumstance but the active director of your recovery. Begin today by preparing your ‘grab-and-go’ kit and reviewing your policy’s declaration page to understand your exact coverages.