A storm damage claim isn’t won by arguing about the weather; it’s won by presenting better data than your insurer, forcing them to acknowledge the specific, localised event that damaged your home.
- Insurers rely on broad, regional meteorological models and strict wind-speed thresholds to validate or deny claims.
- Your most powerful tool is « hyper-local data »—evidence proving severe weather at your exact postcode, which can override their generalisations.
Recommendation: Shift your focus from describing the damage to proving the specific, localised weather event that caused it. This guide shows you how to gather the evidence that claims handlers and the Financial Ombudsman Service cannot ignore.
The letter arrives, and your stomach sinks. A recent gale ripped tiles from your roof and sent water cascading down your bedroom wall, but the two-line conclusion from your insurer is brutally clear: claim denied. The reason? The damage was due to « wear and tear, » or perhaps more bafflingly, the weather « did not meet the policy definition of a storm. » You remember the howling wind and the frightening crash in the night. It certainly felt like a storm. This feeling of powerlessness, of being stonewalled by a technicality, is precisely where most homeowners give up.
The common advice— »read your policy » and « take photos »—feels hollow when you’re up against a system that seems designed to say no. Insurers operate on a strict methodology, a cold calculation of wind speeds, maintenance records, and policy definitions. They are not assessing the weather you experienced; they are assessing whether the data they have on file for your region, on that day, ticks a specific box in their system. This is a crucial distinction. Arguing that it « felt very windy » is futile. It’s like trying to debate physics with a calculator.
But what if the key isn’t to argue, but to present a better calculation? From the perspective of a meteorologist who works with claims departments, the entire process is a data game. Your insurer has their data set—often regional and generalised. Your path to a successful claim, or a successful appeal, lies in building a superior, more specific data set for the micro-climate of your own roof. It’s about shifting from being a victim of the weather to becoming the primary expert on the conditions that affected your property.
This guide will not just tell you what insurers look for; it will explain the meteorological and risk-assessment logic behind their decisions. We will first decode their rulebook—the science of wind speeds and the legal power of the ‘wear and tear’ clause. Then, we will build your counter-strategy, showing you how to document damage like a professional loss adjuster, how to prove your roof was in good shape, and exactly what to say—and not say—on that critical first call to your insurer. This is your playbook for turning a rejection into an approval.
This article breaks down the insurer’s perspective and provides a clear, data-driven strategy for homeowners. The following sections will guide you through each critical stage of the claims process.
Summary: An Insider’s Guide to Overturning a UK Storm Damage Claim Denial
- Why Your Insurer Checks Wind Speeds Before Payout on Roof Tile Damage?
- The ‘Wear and Tear’ Clause: Why Poor Maintenance Voids Storm Claims?
- Trampolines and Greenhouses: What Is Actually Covered During a Storm?
- How to Photograph Storm Damage safely to Ensure Your Claim Is Approved?
- When to Replace Your Roof Felt: The 10-Year Rule to Avoid Leaks
- Why Your Insurer Checks Wind Speeds Before Payout on Roof Tile Damage?
- The Roof Report: Certifying That the Roof Was in Good Condition Before the Storm?
- The First Call: What to Say (and Not Say) When Notifying Your Insurer of a Claim?
Why Your Insurer Checks Wind Speeds Before Payout on Roof Tile Damage?
When you report storm damage, your insurer’s first action isn’t to dispatch a roofer; it’s to consult a meteorologist or a weather data provider. Their goal is to answer one question: did a « storm » event, as defined by the policy, actually occur in your location? This isn’t about your personal experience but about objective, quantifiable data. Insurers need a consistent, defensible benchmark to differentiate between a covered « storm » and uncovered damage from general « bad weather » or poor maintenance.
The most common metric is wind speed. Many UK insurance policies will not classify an event as a storm unless wind speeds reach a certain threshold, often defined by the Beaufort scale. A « Violent Storm » (Force 11 on the Beaufort scale) corresponds to wind speeds of 64-72 mph. However, for claims purposes, the industry often uses a lower, more specific figure. It’s widely understood that many policies define a storm as winds with a mean speed of at least 47 mph (Force 9, a « Severe Gale ») or, more frequently, gusts exceeding a meteorological threshold of 55mph.
This threshold is not arbitrary. It’s based on engineering and meteorological studies that determine the force required to damage a well-maintained property. Below this speed, an insurer will argue that any damage, such as a slipped tile, was more likely caused by a pre-existing weakness—a loose fixing, old mortar, or general « wear and tear »—rather than the wind itself. They are assessing causation. The presence of a « named storm » by the Met Office (like Storm Ciara or Isha) provides strong contextual evidence, but the insurer will still often seek specific wind speed data for your postcode to make their final decision.
The ‘Wear and Tear’ Clause: Why Poor Maintenance Voids Storm Claims?
The « wear and tear » exclusion is the most common reason for claim rejection, and the one that causes the most frustration. From an insurer’s perspective, a policy is designed to cover sudden, unforeseen events, not the inevitable decay of a building over time. They are not insuring your roof against aging; they are insuring it against damage from a defined peril, like a storm. When a claims handler invokes this clause, they are arguing that the storm did not *cause* the failure, but merely *revealed* a failure that was already in progress.
This is where the concept of a « condition precedent » comes into play. It is an implicit condition of your insurance contract that your property is, and will be kept, in a good state of repair. This doesn’t mean your roof must be brand new. The Financial Ombudsman Service (FOS), which handles disputes between consumers and insurers, provides clear guidance on this. They state:
The roof doesn’t need to be new, just in a state a ‘reasonable person’ would consider adequate for its age.
– Financial Ombudsman Service, FOS Storm Damage Guidance
This « reasonable person » standard is key. To successfully defend against a « wear and tear » rejection, you must be able to demonstrate proactive maintenance. Did you have the roof inspected? Do you have receipts for minor repairs? Can you prove the roof was in an « adequate » condition before the storm hit? Without this evidence, the insurer’s default position will be that gradual deterioration is the true culprit. Building a maintenance dossier with receipts, inspection reports, and dated photos is the single most effective way to nullify this common objection.
A well-organised set of records, as shown above, acts as irrefutable proof that you have fulfilled your duty of care for the property. This transforms the conversation from a subjective debate about the roof’s age into a factual discussion about its documented condition before the storm.
Trampolines and Greenhouses: What Is Actually Covered During a Storm?
When a storm hits, the damage is often not confined to the main structure of your home. Gardens can look like a war zone, with trampolines overturned, greenhouses shattered, and garden furniture scattered. A common and costly mistake for homeowners is assuming that their standard home insurance policy provides the same level of cover for these « contents in the open » as it does for the building itself.
Insurers draw a sharp distinction between the building, its permanent fixtures, and loose items in the garden. While a brick-built shed or a permanently installed pergola might be covered under your buildings insurance, items like trampolines and garden furniture fall under « contents. » Furthermore, they are often subject to specific, lower claim limits or may even be excluded entirely when left outside. The risk of these items being damaged by weather is so high that insurers see them as a poor underwriting risk without proof of reasonable precautions being taken.
Greenhouses represent a particularly tricky category, often falling into a grey area between buildings and contents, with many policies drastically reducing cover for glass structures. Crucially, your policy also covers liability. If your unsecured trampoline takes flight and damages a neighbour’s car or property, a claim could be made against the public liability section of your home insurance. Therefore, understanding what is and isn’t covered is essential for both managing your own losses and preventing liability for third-party damage. The following table summarises the typical coverage status for common garden items.
As this comparative analysis of insurance policies shows, the level of cover for garden items varies significantly and is often subject to restrictive conditions.
| Item Category | Typical Coverage Status | Common Claim Limits | Key Conditions |
|---|---|---|---|
| Fixed Structures (Sheds, Pergolas) | Usually covered under Buildings Insurance | Standard policy limits apply | Must be properly secured and maintained |
| Trampolines & Garden Equipment | Contents Insurance (if covered at all) | Often much lower limits or excluded | May require securing measures; higher excess common |
| Greenhouses | Partial coverage under Contents/Buildings | Significantly reduced limits for glass structures | Often subject to ‘contents in the open’ restrictions |
| Garden Furniture | Contents Insurance | Low limits; often excluded entirely | Must demonstrate reasonable precautions taken |
| Liability for Damage Caused BY Your Property | Public Liability section of Home Insurance | Typically £1-2 million liability coverage | Covers damage your property causes to third parties |
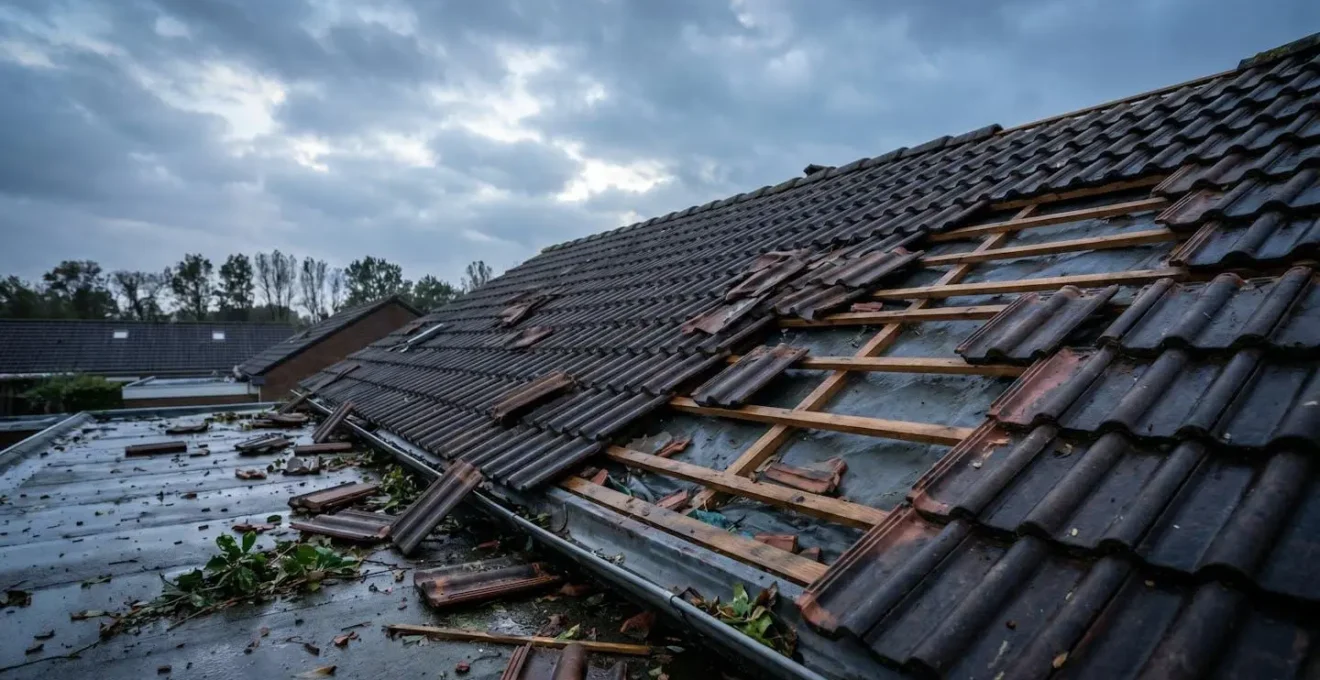
How to Photograph Storm Damage safely to Ensure Your Claim Is Approved?
After a storm, the instinct is to simply point a phone at a broken tile and send it to the insurer. This is a mistake. To a claims handler, a single, context-free photo is weak evidence. You need to approach documentation with the same methodical process as a professional loss adjuster, conducting a « damage triage » that tells a complete and undeniable story. The goal is to create a visual dossier that moves from the general to the specific, proving not just the damage but its immediate context and consequences.
Safety is the absolute priority. Never climb on a roof or enter a structurally compromised area to take photos. All documentation should be done from the ground or from a safe vantage point inside the property. Your evidence should consist of a mix of wide shots, medium shots, and close-ups. The wide shots establish the scene, showing the whole property in the context of the post-storm environment. Medium shots focus on specific areas of failure, like an entire roof slope. Finally, close-up shots zoom in on the exact point of damage—the cracked tile, the hole in the felt, the water entry point.
Beyond static images, a time-stamped video walkthrough is incredibly powerful. As you film, narrate what you are seeing in a calm, factual tone. For example: « This is the master bedroom. Water is entering from the top corner of the ceiling, directly below the area where the tiles are missing. » This combination of visual and audio evidence is difficult for an insurer to dispute. Finally, resist the urge to edit, crop, or enhance your photos. Raw, unedited files contain metadata (EXIF data) that includes the date, time, and sometimes GPS location, which serves as a digital watermark of authenticity.
Your 5-Step Damage Documentation Checklist: Photographing for Approval
- Context & Scale: From a safe distance on the ground, take wide « establishing » shots of the entire property from multiple angles (front, back, sides) to show the overall scene.
- Isolate & Frame: Move closer to capture medium-range shots of each entire affected structure, such as a complete roof slope or a whole damaged wall section, from 10-15 feet away.
- Detail the Failure: Take clear, close-up photos (from 1-2 feet) of the exact breakage points. This includes cracked tiles, uplifted shingles, penetration holes, and points of water entry.
- Document the Aftermath: Move inside to photograph all resulting internal damage. Capture ceiling stains, water drips, damaged plaster, and any affected possessions, linking them back to the external failure point.
- Verify & Preserve: Enable timestamp and GPS features on your camera/phone before shooting. Submit the raw, unedited digital files to your insurer to preserve the authenticating metadata.
When to Replace Your Roof Felt: The 10-Year Rule to Avoid Leaks
Beneath your roof tiles lies a critical, yet often forgotten, line of defence: the roofing felt or membrane. Its job is to provide a secondary waterproof barrier, catching any water that gets past the outer tiles. However, this membrane has a finite lifespan. Older bitumen-based felts can become brittle and crack after 10-15 years, while even modern breathable membranes degrade with long-term UV exposure and temperature fluctuations. An insurer knows this, and when assessing a claim for internal water damage, the age and condition of the felt is a primary focus.
If a loss adjuster inspects your loft and finds brittle, torn, or non-existent felt, it provides them with a powerful argument for a « wear and tear » denial. They will contend that even if a tile was dislodged by wind, a properly maintained membrane should have prevented any significant water ingress. The resulting leak, in their view, is therefore not a direct result of the storm, but of a failure in this secondary, poorly maintained defence. This is why many homeowners are shocked to have their claims denied, a situation reflected in official data. For instance, an FCA review found that in a sample of cases, only 32% of storm damage claims resulted in full or partial payment, highlighting how frequently exclusions are applied.
Proactively assessing and replacing aging roof felt is not just good maintenance; it’s a strategic move to protect your insurability. A visual inspection that reveals deterioration, as seen in the weathered material above, is a red flag. If your roof is over 15 years old and you’ve never had the membrane checked, it’s wise to commission an inspection. A roofer’s report confirming the felt is brittle and requires replacement is a warning. Leaving it unaddressed means that in the event of a future storm, you have very little chance of a successful claim for any resulting water damage.
Why Your Insurer Checks Wind Speeds Before Payout on Roof Tile Damage?
While an insurer’s reliance on a specific wind speed threshold like 55mph is their standard operating procedure, it is not an unchallengeable rule. Their initial check is often based on data from the nearest Met Office weather station, which could be several miles away. This regional data does not account for localised gusts, topographic effects (like wind accelerating over a hill), or the specific aerodynamic pressures on your building. This gap between regional data and your specific location is the key to challenging their initial assessment. You must become the expert on the hyper-local data for your property.
The Financial Ombudsman Service (FOS) has consistently shown it will consider localised evidence over an insurer’s rigid application of policy thresholds. In one landmark case, a claim was denied because the insurer’s data showed wind speeds of only 47 mph. However, the homeowner presented compelling evidence of more severe, localised conditions.
FOS Case Study: Overruling the Meteorological Threshold
In the FOS ruling for complaint reference DRN-4967941, a claim was initially denied because recorded wind speeds of 47mph were below the policy’s 55mph threshold. The Ombudsman, however, upheld the complaint. They considered evidence that a named storm was active, witness accounts, and significant disruption at a nearby airport. The FOS concluded that winds of 47-50mph are generally strong enough to cause structural damage and that applying the threshold rigidly was unfair when all other evidence pointed to a damaging storm at that specific location. This case proves that real-world effects can and do trump theoretical data models.
This ruling provides a clear roadmap. Your task is to gather evidence that proves your home experienced storm-force conditions, regardless of what the nearest official weather station recorded. You can request site-specific historical weather data directly from the Met Office DataHub for your postcode. You can also compile neighbour testimony, dated photos of widespread damage in your immediate vicinity, and even local social media posts documenting the storm’s severity in your area. By presenting this package of hyper-local evidence, you shift the argument from their data to your reality.
The Roof Report: Certifying That the Roof Was in Good Condition Before the Storm?
The most effective way to counter a « wear and tear » rejection is to eliminate the argument before it can be made. This is achieved by having time-stamped, third-party proof that your roof was in a good state of repair *before* the storm occurred. While many homeowners only think about getting a roof inspection after noticing a problem, a pre-emptive report is an invaluable piece of insurance leverage. For new homeowners, the survey conducted during the purchase process can serve this exact purpose.
A formal condition report from a certified professional, such as a member of the NFRC (National Federation of Roofing Contractors) or a RICS-certified surveyor, carries significant weight. It is far more credible than a free quote from a general builder, as it is an impartial assessment of condition rather than a pitch for work. This report provides a baseline of your roof’s health. If it’s clean, it serves as your shield against future « wear and tear » claims. If it identifies minor issues, you can get them repaired and have proof you acted on professional advice, demonstrating proactive maintenance.
The FOS has repeatedly found in favour of consumers who can produce this kind of evidence, as it systematically dismantles the insurer’s argument that the damage was due to gradual deterioration.
Case Study: Using a Pre-Purchase Survey to Nullify a ‘Wear and Tear’ Denial
In a case reviewed by the FOS, a homeowner who purchased their property in November 2023 had a storm damage claim denied in September 2024 on the basis of wear and tear. The homeowner provided the insurer with the professional survey conducted in April 2023 as part of the property purchase. The investigator noted this survey was crucial evidence, as it had found no signs of wear or damage to the roof. This time-stamped proof established the roof’s good condition just before their ownership, forcing the insurer to concede that the subsequent damage must have been storm-related and not a pre-existing issue.
While a full surveyor’s report is the gold standard, there are more cost-effective alternatives. A time-stamped drone survey, costing around £200, can provide high-resolution images of every part of your roof. The key is to obtain a formal, dated « condition assessment report, » not just a « quote for works, » to create an authoritative record of your roof’s health at a specific point in time.
Key Takeaways
- Insurers use a strict meteorological threshold (often 55mph wind speed) to define a ‘storm’, but this can be successfully challenged with specific, hyper-local data for your postcode.
- The ‘wear and tear’ clause is based on the principle that your property must be in a reasonable state of repair; a dated professional report or maintenance records are your best defence.
- Your first communication with the insurer is critical. You should only state the basic facts of the damage and date, avoiding any speculation, opinion, or admission of potential faults.
The First Call: What to Say (and Not Say) When Notifying Your Insurer of a Claim?
The initial phone call to your insurer to report a claim—often called the First Notification of Loss (FNOL)—is one of the most critical moments in the entire process. Everything you say will be logged and can be used to assess your claim. Many well-meaning homeowners inadvertently sabotage their own claims at this stage by saying too much, speculating on causes, or downplaying the damage. The goal of this first call is not to tell a story or to vent your frustration; it is a purely transactional event.
Your objective is threefold: to officially open the claim, to obtain a claim reference number, and to do so without providing any subjective information that could be used against you later. You must resist the urge to offer opinions. Phrases like « I think the wind got under an old tile, » « It was probably our fault for not fixing it sooner, » or « It’s only a small leak » are admissions. The call handler is trained to note these speculative comments. Instead, you must stick to the verifiable facts.
The correct approach is to use a « just-the-facts » script. State your name, policy number, the date the damage occurred, and the nature of the damage in neutral, factual terms (e.g., « roof tiles have been dislodged and there is water ingress in the upstairs bedroom »). Then, shift the dynamic by asking power-shifting questions that put the onus on the insurer to define the next steps. This frames you as an organised, serious claimant who understands the process. Follow up this call with a written email summarising the conversation and confirming your new claim number to create a robust audit trail.
- Use a precise script: Start with « I am calling to open a new claim for storm damage that occurred on [date]. My policy number is [number]. Please provide a claim reference number. »
- State facts, not opinions: Describe what you can see. « There are broken tiles on the ground, » not « The wind must have been really strong to do that. »
- Avoid speculative language: Never use phrases like « I think… », « It might be… », or « The roof was a bit old anyway. » These are recorded as admissions of uncertainty or pre-existing issues.
- Ask power-shifting questions: Put the onus on them. Ask, « What is the excess for this type of claim? », « Do you authorise emergency repairs to prevent further loss? », and « What is your timeline for appointing a loss adjuster or surveyor? »
- Document everything: Immediately after the call, note the date, time, handler’s name, and the claim reference number. Follow up with an email summarising the call to create a paper trail.
Your claim may have been denied, but the process is not over. The next step is to stop reacting and start building your case. Use this guide to assemble your evidence dossier, challenge the insurer’s data with your own, and re-present your claim from a position of strength and expertise. Evaluate your situation with this new knowledge and prepare to take control of the conversation.